macOS apps integration
Learn the technical side of the implementation.
Deprecated informationThis information is listed here in case you continue using Setapp Library. We encourage you to switch to the new Setapp Framework. See how to prepare your macOS app for Setapp here.
What is Setapp macOS Library?
Setapp Library is an individually generated component tied to the app's bundle ID and enables activation and reporting of your app within the Setapp environment. The Library is available on the Edit Version page of your developer account.
When you integrate the Library, your app obtains an activation identifier that works as a license. Also, the Library periodically verifies the state of the Setapp license and blocks access to your app if it's missing or expired.
As for the reporting, Setapp Library monitors app status changes and keeps these statistics. We use this information to fairly split revenue among our developers at the end of each payment period.
We provide 2 separate Library versions:
- for Intel processors only (supporting the x86-64 architecture)
- for both Intel and Apple Silicon chips (with x86-64 and ARM64 architecture)
You may choose to download the corresponding Library version while adding or updating your app in your developer account (see "Download the Library and link it to your app" for details).
Integrate the Library into your app
NOTEYou must have Setapp installed on the local computer where you will assemble the build.
In a nutshell, the integration process comes in the following steps:
- Set an app bundle ID in your developer account.
- Download and link the Library to your project in Xcode.
- Add sandbox temporary exception entitlement (if applicable).
- Implement app usage reporting (if applicable).
- Implement some optional functionality: release notes, email subscription, localization of Setapp UI elements or debug logging.
- Build and test a new app bundle.
NOTEYou must sign your app with a Developer ID certificate on the last stage of preparing the application. Detailed instructions on how to sign the app are available here.
The sections below describe these configuration steps in detail.
Set an app bundle ID
The bundle ID of your app for Setapp must use the -setapp suffix to follow this pattern:
<domain>.<companyName>.<appName>-setappFor example:
com.macpaw.CleanMyMac-setapp
app.macpaw.Gemini-setapp
If your app has additional executables, their bundle IDs must conform to the following pattern:
<domain>.<companyName>.<appName>-setapp.<executableName>For example:
com.macpaw.CleanMyMac-setapp.MenuTo add the bundle ID, follow these steps:
- Go to the Apps page in your developer account. You'll see that your app is already there. Click Add First Version.
- Enter the bundle ID of your app in the dialog that appears.
It is critical to use the same bundle ID in the Xcode target of your app and your developer account. Update your app's target if needed.
What is bundle ID?A bundle ID is a unique case-sensitive identifier that contains only alphanumeric characters (A-Z,a-z,0-9), period (.), and hyphen (-). Please note that only hyphen-minus sign (U+002D) can be used (don't press the Option key). Also, note that you mustn't specify an app version in the bundle ID.
The string must be written in reverse-DNS format. Example: Your domain is mycompany.com, and your app's name is MyApp. In this case, you can use com.mycompany.myapp-setapp as a bundle ID of your app.
You will not be able to change the bundle ID once you set it.
Download the Library and link it to your app
Your app may consist of multiple executables that can operate as separate units and directly interact with a user (for example, CleanMyMac and CleanMyMac Menu).
In this case, you need to take these steps:
- Link each executable with the Setapp Library by performing the steps described in this section.
- Inform your Developer Support Representative about the executable you're adding so that we can register the additional bundle ID in the Setapp system.
These steps are the obligatory requirements determined by the event-based usage reporting and further revenue distribution.
Also, note that a bundle ID of an additional app executable must use the -setapp prefix and conform with the following pattern:
<domain>.<companyName>.<appName>-setapp.<executableName>To download the Library, follow these steps:
- On the Apps page of your account, find an app with the Live status and click "+ Add new version."
- To the right of the Build section, select the Library version (for Intel or Apple Silicon chips) and click the corresponding link to download the Lib.

We recommend using the latest version of the Library for every update of your app. We will notify you about the major Library updates via email.
To link the Library with an executable in your app, follow these steps:
- Extract the Library files from the downloaded .zip archive.
- Add the extracted files (
libSetapp.aandSetapp.h) to your project. - Select the "Copy items if needed" checkbox and deselect all items in the "Add to targets" list.

Adding Setapp Library to your app target in Xcode project
WARNINGYou must strictly follow the instructions provided in step 5 to make your application function correctly within the Setapp environment.
- Link
libSetapp.ato the app target. Go to the Build Settings tab of your project and add one of the following value strings to Other Linker Flags:
-
If
libSetapp.ais located in the project root folder. Use this string value:-force_load "$(PROJECT_DIR)/libSetapp.a" -framework Security -framework IOKit -framework QuartzCore -framework Cocoa -
If 'libSetapp.a' has another location, use this string value:
-force_load "<path_to_lib_folder>/libSetapp.a" -framework Security -framework IOKit -framework QuartzCore -framework Cocoa

Linking the Library to the application target
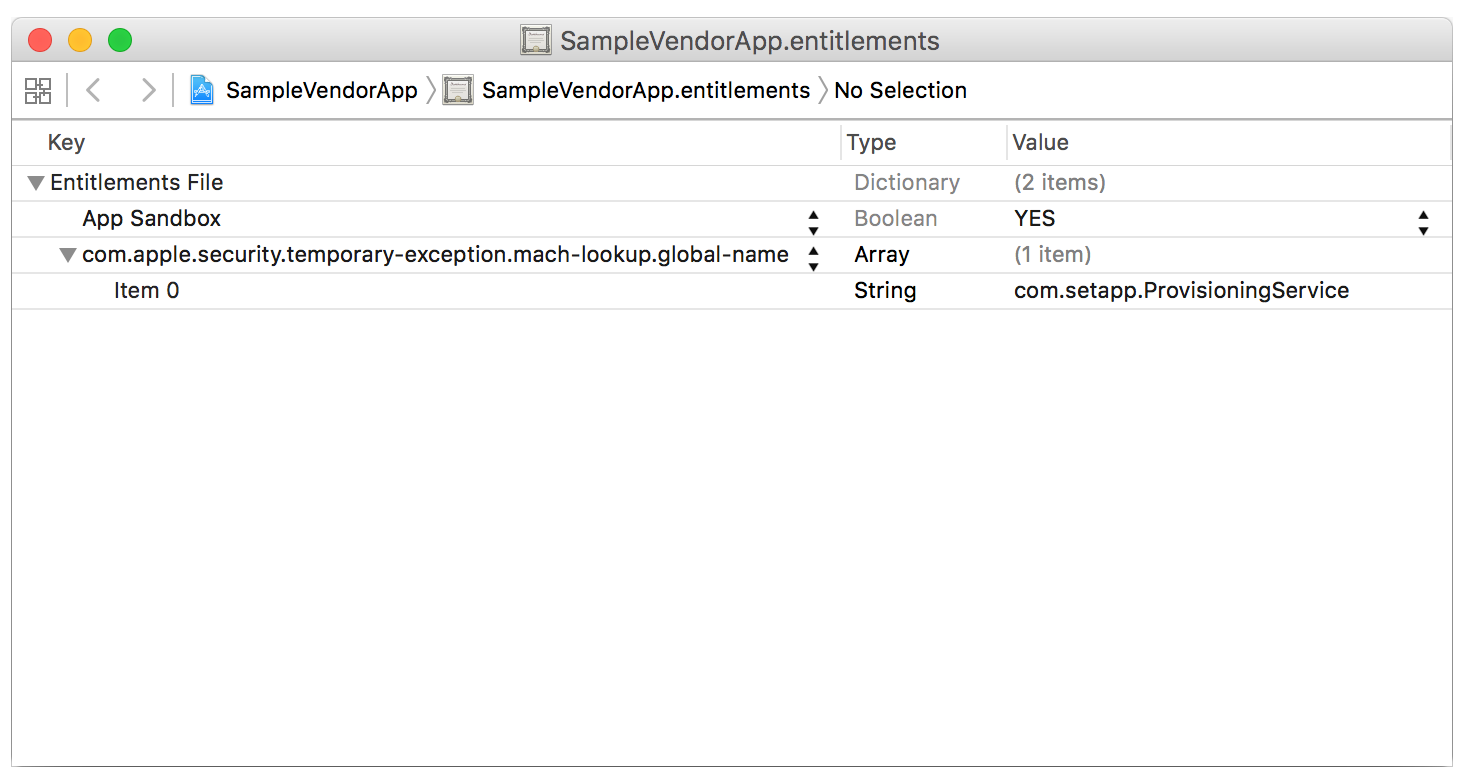
Add sandbox temporary exception entitlement
If your app is sandboxed, you must add a temporary exception to enable communication between the Library integrated into your app and Setapp Mach services.
To do this, open the entitlements file of your project and add the Setapp service as the com.setapp.ProvisioningService string value for the com.apple.security.temporary-exception.mach-lookup.global-name entitlement key’s value array. As a result, your entitlements file will look similar to the following:
Implement the release notes (What's New) functionality
We highly recommend implementing the release notes functionality into your app as it improves user experience. However, the decision is yours to make.
-
Automatically show a dialog with a list of changes in the updated app version:
Call theSCShowReleaseNotesWindowIfNeededfunction in theapplicationDidFinishLaunchingmethod (or add it to another appropriate place, for example, after the onboarding dialog of your app). Note that this function reveals a dialog only after opening a newly updated app. -
Provide users with a possibility of viewing release notes anytime they want:
Add a corresponding option to the app's main menu. It must call theSCShowReleaseNotesWindowfunction.
For example:
//
//  AppDelegate.m
//  TestApp
//

#import "AppDelegate.h"
#import "Setapp.h"

@implementation AppDelegate

- (void)applicationDidFinishLaunching:(NSNotification *)aNotification {
    // ...
    SCShowReleaseNotesWindowIfNeeded();
    // ...
}

- (IBAction)showReleaseNotes:(id)sender {
    SCShowReleaseNotesWindow();
}

@end
//
// AppDelegate
// TestApp
//
// Do not forget to import Setapp.h to your bridging header file
import Cocoa
@NSApplicationMain
class AppDelegate: NSObject, NSApplicationDelegate {
func applicationDidFinishLaunching(aNotification: NSNotification) {
// ...
SCShowReleaseNotesWindowIfNeeded()
// ...
}
@IBAction func showReleaseNotes(sender: AnyObject?) {
SCShowReleaseNotesWindow()
}
}For Swift, make sure the bridging header has been created — you’ll need it for importing the Setapp.h file into it.
Implement usage reporting
App usage statistics are one of the key factors affecting the amount of revenue you obtain. Therefore, we implemented event-based reporting of app usage. Setapp Library detects events related to the usage of an app and accumulates them in reports, which are sent to the Setapp server once a day. At the end of the month, all reports from every user account get processed to split the payments between the apps that were used.
NoteWe do not take into account the number of usages of a particular app per month. The terms of revenue distribution are equal for apps used only once and for apps used every day. Read more in Distributing revenue.
Depending on the type of an application, Setapp needs to detect different events and their combinations. We distinguish the following types of apps:
- Regular app (runs in a separate window and requires no additional authorization)
- App that requires sign-in to give access to its functionality
- App that operates as a menu bar extra
Most of the events are detected automatically and are common for all types of applications. These events include:
launch— sent on the launch of the appterminate— sent when the app is shut downactivate— sent when the app window becomes frontmostdeactivate— sent when the app stops being frontmostheart-beat-active— sent periodically when the app is running as the frontmost oneheart-beat-inactive— sent periodically when the app is running in the background
However, apps with obligatory sign-in and menu bar extras must report additional usage events due to the specifics of their functioning.
For example, an app only gives access to its main functionality after sign-in. A user won't get any value after simply launching this app. Thus, receiving the launch event isn't enough to consider the app used. That's why Setapp counts the sign-in event as a fact of usage. In this example, the detection of the sign-in event is configured manually, and it is sent repeatedly to cover cases when a user keeps your app open.
Reporting of events specific to menu bar extras and apps with obligatory sign-in must be implemented manually.
NoteSkip the configuration steps described below if your application belongs neither to applications that require sign-in nor to apps that function as menu bar extras.
To implement the reporting functionality, insert SCReportUsageEvent function calls with the following event types (all appropriate cases must be covered):
-
For apps that require authorization:
sign-in– send this event repeatedly right after a user has signed in to your app or right after the app launch if a user is already signed in.sign-out– send this event right after a user has signed out from your app.
-
For menu bar apps:
user-interaction– send this event right after a user has activated your app by clicking on its icon in the menu bar.
For example:
// For example, this method is called when a user successfully signed in.
// Just add the SCReportUsageEvent function call with an appropriate "sign-in" event to this method.
- (void)yourSigninCompletionHandler
{
    ...
    SCReportUsageEvent(@"sign-in", nil);
}


// This method is called after successful sign-out.
// Likewise, add the SCReportUsageEvent function call with the "sign-out" argument.
- (void)yourSignoutCompletionHandler
{
    ...
    SCReportUsageEvent(@"sign-out", nil);
}
// For example, this method is called when a user successfully signed in.
// Just add the SCReportUsageEvent function call with an appropriate "sign-in" event to this method.
func yourSigninCompletionHandler() {
...
SCReportUsageEvent("sign-in", nil)
}
// This method is called after successful sign-out.
// Likewise, add the SCReportUsageEvent function call with the "sign-out" argument.
func yourSignoutCompletionHandler() {
...
SCReportUsageEvent("sign-out", nil)
}Add an email subscription form
As a developer, you might want to stay in touch with your users on Setapp. We understand this intention and gladly provide a list of their contacts if users consent. But first, you need to implement User Permissions API that allows you to offer a user to share their email address. This way, you can create a permission-based email list of your active users. Later, you can download it directly from your developer account.
To check whether a user has already been asked for email permission for the current app, call the SCGetLastUserEmailSharingResponse function. It returns info about the user's previous action in response to an email-sharing dialog.
To show a dialog that offers a user to share their email with the current app, call the SCAskUserToShareEmail function.
Learn more in the ‘Setapp.h’ file.
NOTEWe strongly recommend to refrain from asking for a user’s permission at the first app launch. Let a user try your application and form their estimate.
Also, note that you won’t be able to ask for email permission again after a user makes a clear choice (allow or refuse to share personal data). However, if the user closes the dialog without making a choice, you can show the dialog again within these intervals after your previous reveal:
2nd time — 1 day
3rd time — 2 days
4th time — 3 days
5th time — 7 days (this interval will repeat three times)
8th time and after — 30 days
//
//  AppDelegate.m
//  TestApp
//
#import "AppDelegate.h"
#import "Setapp.h"
@implementation AppDelegate
- (void)applicationDidFinishLaunching:(NSNotification *)aNotification {
    // ...
    NSUInteger currentLaunchCount = 0; // e.g. getting from NSUserDefaults
    NSUInteger minLaunchesBeforeAskPermissions = 0; // some logic here
    BOOL userDidLikeMyApp = YES; // some logic here

    if (SCUserEmailSharingResponseAskLater == SCGetLastUserEmailSharingResponse()) {
        // update currentLaunchCount or minLaunchesBeforeAskPermissions
        // or other logic here
    }

    if (userDidLikeMyApp && currentLaunchCount >= minLaunchesBeforeAskPermissions) {
        SCAskUserToShareEmail(^(SCUserEmailSharingResponse userResponse) {
            if (SCUserEmailSharingResponseAskLater == userResponse) {
                // save needed info to choose appropriate time to ask again
            }
        });
    }
    // ...
}
//
// AppDelegate
// TestApp
//
// Do not forget to import Setapp.h to your bridging header file
import Cocoa
@NSApplicationMain
class AppDelegate: NSObject, NSApplicationDelegate {
func applicationDidFinishLaunching(aNotification: NSNotification) {
// ...
let currentLaunchCount = 0 // e.g. getting from NSUserDefaults
let minLaunchesBeforeAskPermissions = 0 // some logic here
let userDidLikeMyApp = true // some logic here
if (SCGetLastUserEmailSharingResponse() == .askLater) {
// update currentLaunchCount or minLaunchesBeforeAskPermissions
// or other logic here
}
if (userDidLikeMyApp && currentLaunchCount >= minLaunchesBeforeAskPermissions) {
SCAskUserToShareEmail({ (userResponse: SCUserEmailSharingResponse) in
if (userResponse == .askLater) {
// save needed info to choose appropriate time to ask again
}
})
}
// ...
}
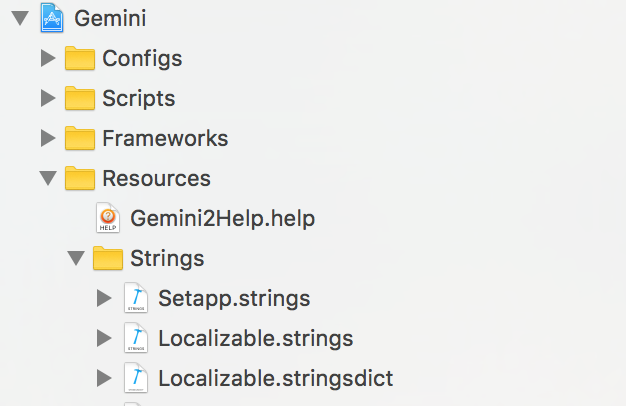
}Localize Setapp UI elements
Setapp Library includes a few UI elements that you may want to localize. For example, it could be the release notes window or email subscription dialog.
To make these Setapp elements localized, do the following:
- Open the Setapp Library archive and navigate to the Resources folder.
- Drag-n-drop the 'Setapp.string' file from the Resources folder to your Xcode project (ProjectName > Resources > Strings). The result should look like this:
Enable the debug logging
This configuration step is optional, but if you want to check app usage events, license validation results, or other details related to Setapp Library activities, turn on Setapp debug logging as described below.
Call the SCEnableDebugLogging function set to 'YES' to enable the debug logging of Setapp Library.
If you want to have full Setapp Library logs (including app launch events), call the function on the app launch.
To turn off the debug logging, call the SCEnableDebugLogging function set to 'NO'.
NOTESetapp debug logging must be used only in the app's debug configuration. Please disable the debug logging before building release versions of the app.
//
//  AppDelegate.m
//  TestApp
//
#import "AppDelegate.h"
#import "Setapp.h"
@implementation AppDelegate
- (void)applicationDidFinishLaunching:(NSNotification *)aNotification {
#ifdef DEBUG
    SCEnableDebugLogging(YES);
#endif
    // ...
}
//
// AppDelegate
// TestApp
//
// Do not forget to import Setapp.h to your bridging header file
// and declare a special variable that shows whether DEBUG is turned on
// Example:
// #ifdef DEBUG
// static const BOOL isDebug = YES;
// #else
// static const BOOL isDebug = NO;
// #endif
import Cocoa
@NSApplicationMain
class AppDelegate: NSObject, NSApplicationDelegate {
func applicationDidFinishLaunching(aNotification: NSNotification) {
if !isDebug.boolValue {
SCEnableDebugLogging(true)
}
// ...
}
}
NOTEBefore you generate a new app bundle, make sure that your app's Info.plist file contains the
MDItemKeywordsandLSApplicationCategoryTypekeys with correct values. This enables indexation of your app by Spotlight and allows users to find it by name even if the app wasn’t installed.
You can find more information about keywords here.
Now, you can complete your integration of the Library and create a new app bundle.
NOTEDon’t forget to sign your app with a Developer ID certificate. Detailed instructions on how to sign the app are available here.
The last step before you can submit your first app version is a quick test of your app within the Setapp environment.
Using Vendor API to integrate apps into Setapp
Request the authorization code to access the Setapp server
To start communicating with Setapp's server, request an authorization (auth) code from it. The auth code lasts a 20-minute lifetime, and you must pass it to your server for further processing.
The communication between your app/server and the Setapp system via the Vendor API looks like this:
- Your app requests and receives an auth code from the Setapp server.
- Your app passes the auth code to your server.
- Your server exchanges the auth code for the Vendor API's access token and refresh token.
- Your server uses the obtained tokens for further communication with Setapp using the API (exchanging subscription info, usage reposting, etc.).
You can get the auth code using the SCRequestAuthorizationCode function. The function requires an internet connection and fails with a corresponding error if a Mac, from which the request has been sent, is offline.
To request the auth code, you must specify these parameters:
-
clientID: the app's client ID generated in your developer account. If you have several apps in Setapp, theclientIDmust be different for each of them (including macOS apps and their iOS companions). -
scope: an array of strings that specifies the functionalities you wish to authorize for communication with the Setapp system. Use theSCVendorAuthScopeenum for scope specification.
Presently only application.access can be requested through the macOS Library. If you request other scopes, an error will return.
For your reference only:The other possible functionalities' scope values are mentioned in the GET /authorize method of the Vendor API. At the moment, it can only be requested using Sign in with Setapp.
Below is a request example:
//
// AppDelegate
// TestApp
//
// Do not forget to import Setapp.h to your bridging header file
import Cocoa
@NSApplicationMain
class AppDelegate: NSObject, NSApplicationDelegate {
  func applicationDidFinishLaunching(aNotification: NSNotification) {
    SCRequestAuthorizationCode("c1d5ab4a5666fc62983b7a6eaa9b1e53c8318a3ef70c182a",
    [SCVendorAuthScope.applicationAccess.rawValue]) {
      (code, error) in
      if let error = error {
        // The request has failed.
        // See the error message for details.
        return
      }
      if let code = code {
        // Authentication code obtained successfully.
        // Use the code to authorize your app or server for Setapp: exchange the auth code for the access token and the refresh token using the Setapp API.
      }
    }
  }
}
//
// AppDelegate.m
// TestApp
//
#import "AppDelegate.h"
#import "Setapp.h"
@implementation AppDelegate
- (void)applicationDidFinishLaunching:(NSNotification *)aNotification {
SCRequestAuthorizationCode(
clientID: "c1d5ab4a5666fc62983b7a6eaa9b1e53c8318a3ef70c182a",
scope: [SCVendorAuthScope.applicationAccess],
^(NSString *_Nullable authorizationCode, NSError *_Nullable error) {
if (error)
{
// The request has failed.
// See the error message for details.
return;
}
if (authorizationCode)
{
// Authentication code obtained successfully.
// Use the code to authorize your app or server for Setapp: exchange the auth code for the access token and the refresh token using the Setapp API.
}
});
}
@endUpdated over 1 year ago